
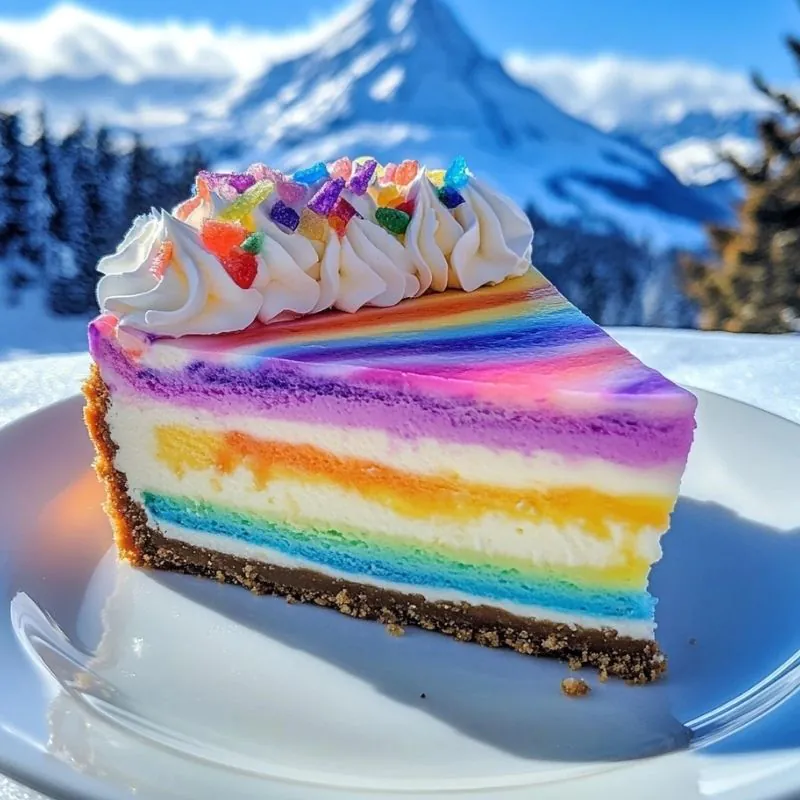
Who wouldn’t want a dessert as magical as this? This stunning Rainbow Swirl Cheesecake Trifle is a feast for the eyes and the taste buds. Each layer is beautifully colored and creamy, making it a perfect centerpiece for celebrations. And the best part? It’s easier to make than it looks! Let me guide you through this vibrant and dreamy dessert.
Ingredients
For the Crust:
- 2 cups of graham cracker crumbs – The buttery, crumbly base adds the perfect crunch to complement the creamy filling.
- 6 tablespoons of unsalted butter (melted) – Helps bind the crust together for that solid foundation.
- 2 tablespoons of sugar – Adds a hint of sweetness to the crust.
For the Cheesecake Layers:
- 3 packages (8 oz each) of cream cheese, softened – The heart of any good cheesecake. Make sure it’s softened for a smoother texture.
- 1 cup of granulated sugar – Balances the tanginess of the cream cheese.
- 1 teaspoon of vanilla extract – Adds warmth and depth to the flavor.
- 3 large eggs – Creates a rich, custardy texture when baked.
- Food coloring (red, orange, yellow, green, blue, purple) – The secret to creating those vibrant rainbow layers.
- 1 cup of heavy cream – Whipped to perfection for extra creaminess.
For the Whipped Topping:
- 1 cup of heavy cream – Beat it until fluffy for the crowning glory of the trifle.
- 2 tablespoons of powdered sugar – Keeps it light and sweet.
- A few drops of food coloring (optional) – To create those swirled rainbow peaks.
How to Make the Rainbow Swirl Cheesecake Trifle
Step 1: Prepare the Crust
- Preheat your oven to 350°F (175°C).
- In a mixing bowl, combine the graham cracker crumbs, melted butter, and sugar. Stir until it resembles wet sand.
- Press the mixture firmly into the bottom of a springform pan. Bake for 10 minutes, then set aside to cool.
Step 2: Make the Cheesecake Batter
- In a large bowl, beat the cream cheese until smooth and creamy. Gradually add the sugar and vanilla extract.
- Beat in the eggs, one at a time, mixing well after each addition.
- Divide the batter evenly into six bowls. Add a few drops of food coloring to each bowl to create your rainbow colors.
Step 3: Layer the Cheesecake
- Pour the purple batter into the crust, spreading it evenly. Freeze for 10 minutes to set.
- Repeat the process with blue, green, yellow, orange, and finally red, freezing each layer before adding the next. This ensures clean, defined layers.
Step 4: Bake the Cheesecake
- Once all layers are in place, bake the cheesecake in a water bath at 325°F (160°C) for about 1 hour, or until the edges are set and the center jiggles slightly.
- Turn off the oven and let the cheesecake cool inside with the door slightly open. Then chill it in the fridge for at least 4 hours or overnight.
Step 5: Whip Up the Topping
- Beat the heavy cream and powdered sugar until soft peaks form.
- Divide the whipped cream into separate bowls and tint each with your food coloring. Gently swirl the colors together before piping onto the cheesecake.
Equipment Needed
- Springform pan
- Mixing bowls
- Electric mixer
- Spatula
- Piping bag (for whipped topping)
- Oven-safe roasting pan (for the water bath)
Frequently Asked Questions
Can I make this recipe ahead of time?
Absolutely! This cheesecake tastes even better the next day. You can prepare it 1–2 days ahead and add the whipped topping just before serving.
Do I have to use a water bath?
While not mandatory, a water bath ensures your cheesecake bakes evenly and avoids cracks. Simply place the springform pan in a larger pan filled with hot water.
What if I don’t have a springform pan?
You can use a deep pie dish instead, but it may be harder to release the cheesecake cleanly. Lining the dish with parchment paper can help.
Can I use gel food coloring instead of liquid?
Yes! Gel food coloring works wonderfully, as it provides vibrant colors without thinning the batter.
How do I store leftovers?
Cover the cheesecake tightly with plastic wrap or foil and refrigerate for up to 5 days. You can also freeze individual slices for up to 2 months.
Can I make this recipe gluten-free?
Swap the graham crackers for gluten-free crumbs, and you’re all set!
What’s the best way to slice the cheesecake?
Use a warm knife (dip it in hot water and wipe dry) to get clean slices. Wipe the knife between cuts for best results.
Conclusion
I hope you’re as enchanted by this Rainbow Swirl Cheesecake Trifle as I am! It’s truly a dessert that wows, whether it’s for a birthday, Pride celebration, or simply because you deserve something special. If you enjoyed this recipe, don’t forget to share it on Facebook using the buttons below or save it on Pinterest for your next baking adventure. Let’s spread the joy, one colorful slice at a time!
